Understanding Git
Last updated: Jan 5, 2025The Git website reads that Git is a free and open source distributed version control system. Git is a version control system (VCS) because it tracks file changes. This is crucial because when working on a software project, it’s important to know how to manage your changes effectively. Take a look at the image below :
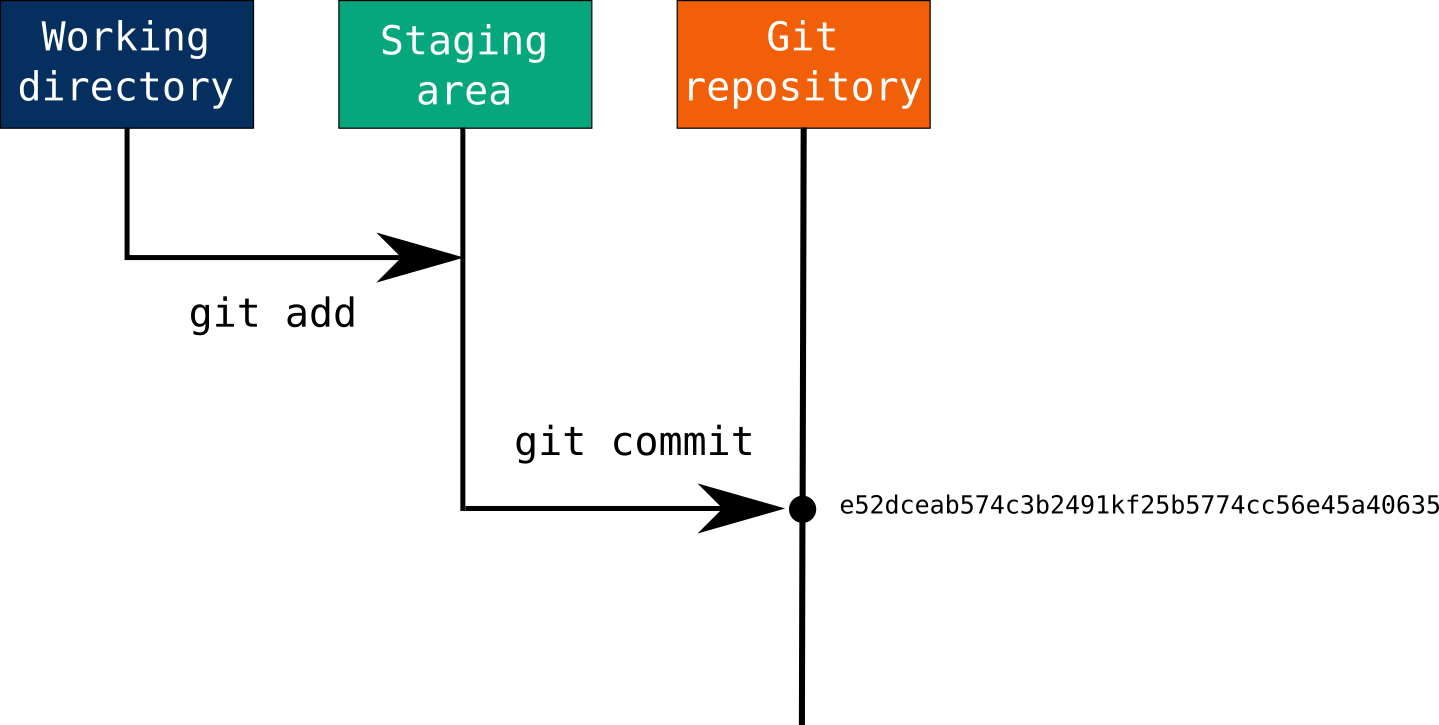
Graphite.dev explains this process as follows :
Git manages a directed acyclic graph of snapshots. Every commit represents a snapshot of your project’s files at a certain point in time. Before something becomes a commit, it first resides in something known as the staging area. The git add command moves changes from your working directory (the place where you edit files) into this staging area (an index, or record of what’s about to be committed). Then git commit converts whatever is staged into a new snapshot. Finally, git push transfers those snapshots from your local repository to a remote repository, making them visible to your team.
Git is not the only Source Code Management (SCM) software in market. Subversion & Mercurial are other alternatives. Subversion maintains each revision as changeset. Hg uses both changeset and snapshot while Git purely uses snapshot to store the data.
If you’re working alone on your local system, remote repo isn’t necessary. If you wish to collaborate on the project so that other people can contribute to your source code, then remote repo is indeed preferred (though not mandatory since Git VCS is “distributed” by design). The most popular remote repository is Github. Others are Gitlab, Bitbucket, Sourcehut & Atlassian. The bio of subreddit r/github calls it a “social coding” platform. As I’ll highlight later, its quite like a social media platform for coders !
Working with Git
Download git and git-bash softwares from their websites. Create a local folder. Git bash into it. Then run git init. This will initialize that folder as a git repo having a .git folder, which contains all the necessary metadata and version history for your project. Now you can use any code editor or IDE to create your sourcecode files in the folder. (I personally use Sublime for heavy-text & light-code repos like my github blog, while VSCode for code-heavy projects because it has excellent inbuilt plugins, debugger & recently Github Copilot integration. For Python projects, I use Anaconda). You can add files to the staging area using git add filename and commit them with git commit -m "Your commit message". You can create branches to work on different features or fixes independently. Use git branch branch-name to create a new branch and git checkout branch-name to switch between branches. Merging branches is also possible with git merge branch-name. All changes you make are recorded in the local repository’s history, which you can view using commands like git log. This allows you to revert to previous states of your project if needed. If you want to view the repository as it was at a specific commit, you can check out that commit using its hash.
bash: git checkout commit-hash. To view details about a specific commit, including changes made in that commit, use: git show commit-hash. After viewing a previous state, you can return to your latest commit on your current branch with: git checkout master. If you want to see what changed between two commits, you can use: git diff commit-hash-1 commit-hash-2.
You can run all these git operations as commands in the Command Line/Git Bash/Terminals inbuilt in the editor or IDE. When I was a newbie I used Windows CMD, then I downloaded Git Bash because it showed the current branch as well. Later I learned about inbuilt terminals inside code editors/IDEs which is my preferred choice till date. However many developers prefer a GUI (also called a Git Client) for these git operations. Popular ones are Github Desktop, Sublime Merge, Fork, Sourcetree, Tower, SmartGit, GitKraken Desktop, etc.
NB. Don’t confuse between Github Desktop and Github CLI softwares. GitHub Desktop is a GUI for interacting with Git, while GitHub CLI is a CLI specifically designed to interact with GitHub. To utilize all features (eg. visibility settings, licensing, README) available right when creating a repository on GitHub, it’s recommended to first create the repository online using the Github webpage or Github CLI with gh repo create command. Once created, you can then clone it locally or push an existing local repository to it.
Working with Github
When many developers wish to merge their contributions to the same master codebase, “merge conflicts” can arise. A web platform like Github handles these merge conflicts like a pro. “Forking” a repository on github.com creates a personal remote copy of a repo under your GitHub account, allowing you to make changes without affecting the original project (known as the upstream repository). “Cloning” is the process of creating a local copy of a remote repo (either original or forked) on your machine, enabling offline work using the command: git clone repository-url.
After making local changes to the repo, perform the usual git add-commit sequence we’d discussed. Then push the changes to the remote forked repo using the git push command. Then you can go to github.com and submit a “Pull Request (PR)” to propose those changes to the original project. The owner of the original project may accept those changes.
Working between Local & Remote copies of your Git Repo
If you are sharing your local Git repo on Github, you will have 2 copies of your repo - Local (in your PC) & Remote (in the Github server). You may wish to edit the local repo & want to reflect the changes in the remote repo also, or vice-versa. You may also want to work on a branch and merge changes with the master. For all such exercises, this article shines a light.
To add a remote repo to your local git project and name it say origin, use the git remote add origin <url> command. To check if its added, use git remote -v to list all remotes. To remove the existing remote,
To rename your remote project from origin to say myProject use git remote rename myProject origin
Once your Local & Remote Repos are setup and linked, you can continue your work as follows.
Working on ‘master’ branch
Pushing local changes to remote
Make local changes
git add . (Tracking)
git commit -m “changes” (Staging)
git push origin master (Pushing)
Pulling remote changes to local
Make remote changes
git fetch origin
git merge origin/master
Or simply: git pull origin master
Working on another branch (say ‘develop’)
Pushing local changes to remote
git branch develop
git checkout develop
Make local changes
git add .
git commit -m “changes”
git push origin develop
Pulling remote changes to local
1st time
Create a new branch ‘develop’ in github & edit it
git fetch
git branch develop origin/develop
After 1st time
Make changes in ‘develop’ in github
git fetch
git merge origin/develop
Or simply: git pull origin develop
After changes to ‘develop’ branch are made, & you want to merge it with master branch
On master branch: git merge develop
nb. There’s a concept called “pull request” only in github where you can create a “pull request” in github while you’re on the develop branch
This will flag a notification on master branch in github with an option for merge. Command line git has no role in this affair.
Deleting ‘develop’ branch after its merged with master & no longer needed
To delete local copy : git branch -d develop
To delete remote copy also : git push origin –delete develop`
Sometimes you work on both your local and remote repositories depending on your mood ! In such cases a gap is created between the two. In VSCode you can use the sync feature in the version control UI to pull and push simulatneously to close the gap. If the gap is too large, it may not work. In such cases, first pull the remote changes using git pull origin <branch_name> --allow-unrelated-histories. And then push them using git push origin <branch_name>